GisBridge QuickStart Guide
Welcome to the GisBridge quickstart!
This guide walks you through importing GIS data (Shapefiles and GeoJSON) directly into SketchUp using the GisBridge extension.
Introduction
GisBridge allows you to import various GIS data types:
- Points: Can be imported as SketchUp Construction Points, Components (e. g., trees) or as a Terrain.
- Lines: Can be imported as Edge lines or Tubes (representing e.g., subway or gas pipes).
- Polygons: Can be imported as Edge loops, Faces, or full 3D volumes.
Getting Started
Installation and Access
- Installation: To install GisBridge, please open Extension > Extension Manager and search for GisBridge. Once GisBridge is installed you can start it using the following options:
- GisBridge Menu Button (1): Once installed, find GisBridge under Extensions > GisBridge.
- Toolbar (2): You can also enable the toolbar via View > Toolbars >
GisBridge.
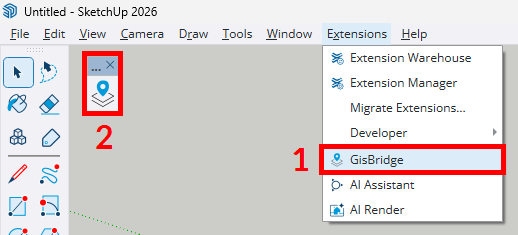
- Open GisBridge: Click GisBridge Menu Button (1) or the Toolbar Icon (2) to open the main GisBridge window and start importing your GIS files.
Preferences
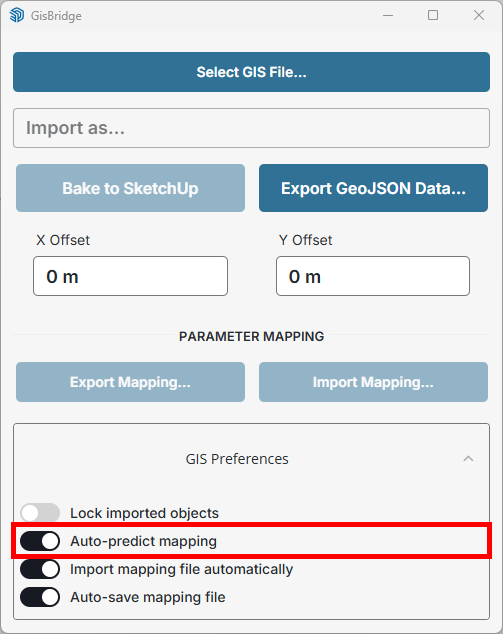
Before importing, let's explore the Preferences in the GisBridge window:
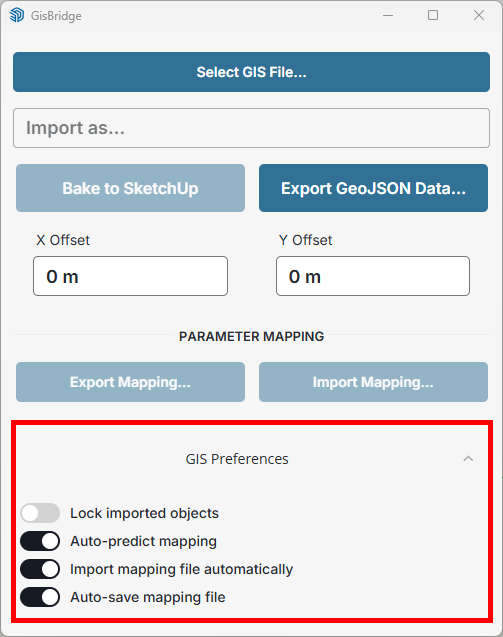
- Lock imported objects: Toggle whether imported objects should be locked by default or not.
- Auto-predict mapping: GisBridge comes with an auto-prediction algorithm that maps specific GIS attributes to parameters it understands. In case relevant keyword is found as attribute name(eg., "Height") it will be automatically mapped by GisBridge when it makes sense (eg. when importing polygons that represent buildings). Note auto-prediction also learns your mapping to better guess mapping each time you import new GIS file.
- Import mapping file automatically: Load previously mapped settings (if any) when loading new GIS file.
- Auto-save mapping file: When enabled, your mapping configurations are stored in a file next to your GIS source file. This allows for automatic reuse of mapping settings when you reload the same data.
Automatic Geolocation
In order to streamline your GIS data import experience, GisBridge features Automatic Geolocation.
- You don't need to manually set the location in SketchUp (File > Geo-location > Add Location...) upfront.
- GisBridge reads the coordinates from your GIS data and geolocates the SketchUp model automatically upon loading.
- You can verify this in Window > Model Info > Geo-location and add satellite images later.
Importing GIS Data to SketchUp
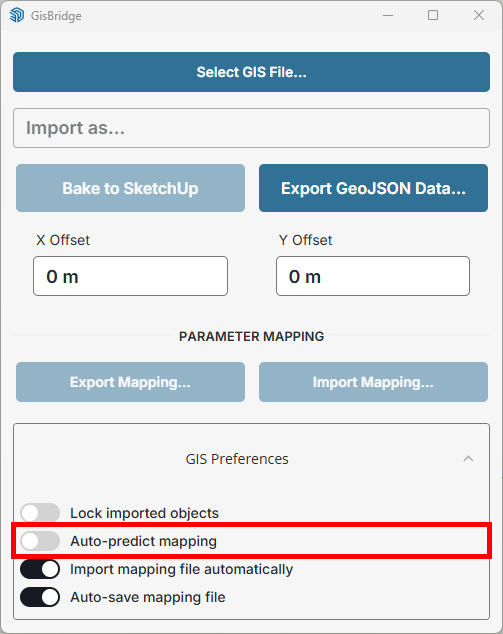
1. Turn off "Auto-predict mapping"
To demonstrate the power of automatic mapping prediction, let's first turn it off (we'll later turn it back on):
2. Download Example Files
Download the files used in this QuickStart.
3. Importing Lines
Let's start by opening GIS Line features that represent downtown Manhattan subway lines. We'll start with manual mapping, and switch to auto-mapping later.
- Load the data: Click on Select GIS File… button and open
/GisBridge-QuickStart/NYC_subway.shpfile. - Overlay Preview: Once the file is loaded, GisBridge will immediately show the preview of what you are importing*.
- Set PARAMETER MAPPING:
- Map the
tube_width (12)attribute toTube Diameterparameter. - Map
color ("#FCCC0A")attribute toObject Color. - Map the
elevation (-10)attribute toElevation Above Sea Levelparameter to specify the Z height at which the lines will be generated. - Create Geometry: Click "Bake to SketchUp" to convert the preview into selectable SketchUp geometry.
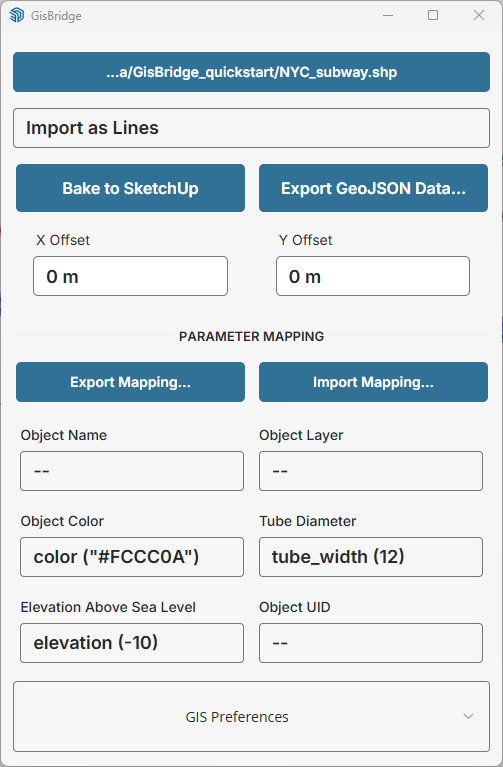
* - If you don't see the preview, check Window > Default Tray >
Overlays and ensure "GisBridge" is checked.
** - Attribute values are shown using this pattern: attribute_name
(sample_value). Eg. color ("#FCCC0A") means the name of the attribute is
color and one of its values is "#FCCC0A" (note quotation marks letting
you know the type of the value is string/text).
4. Import GIS data using Auto-predict mapping
To see how Auto-predict mapping works, open a new SKP model. This empties GisBridge Window. Now make sure to turn "Auto-predict mapping" preference back on.
5. Importing Points as Components (e.g., Trees)
Let's now opening GIS Point features that represent downtown Manhattan trees.
- Load the data: Click on "Select GIS File…" button and open
/GisBridge-QuickStart/NYC_trees_species.geojsonfile. Note you only see construction points preview for now. Let's fix that! - Switch Conversion Type: Select "Import as Components" option from the Feature Conversion Type dropdown. Notice the magic - the PARAMETER MAPPING section is already autopopulated!

- Set MAP COMPONENT USING:
- Map the
acerattribute toAcer (Maple) #1component. - Map the
platanusattribute toPlatanus (Plane) #1component. - Map the
quercusattribute toQuercus (Oak) #1component.
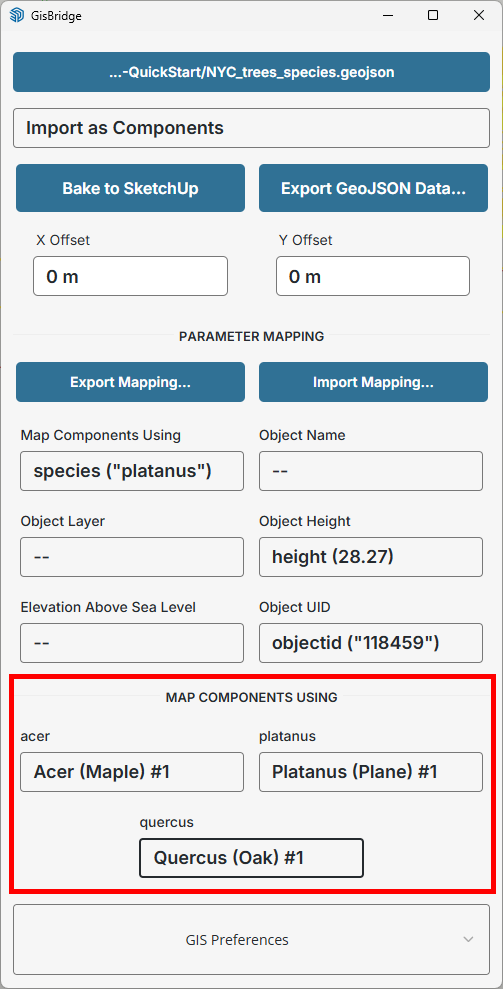
- Create Geometry: Click "Bake to SketchUp" to import mapped tree components to your SketchUp model.
6. Importing Polygons
To complete this quickstart guide, let us now import polygon features representing buildings.
- Load the data: Click on "Select GIS File…" button and open
/GisBridge-QuickStart/NYC_buildings.geojsonfile. Note you only see building outlines preview. - Switch Conversion Type: Select "Import as Face" option
from the Feature Conversion Type dropdown. Now the auto-mapping already
recognized
Object Name,Object HeightandObject UIDattributes. Feel free to adapt the mapping to suit your needs (eg. removeHEIGHT (17.62)fromObject Heightparameter to see only floor plans).
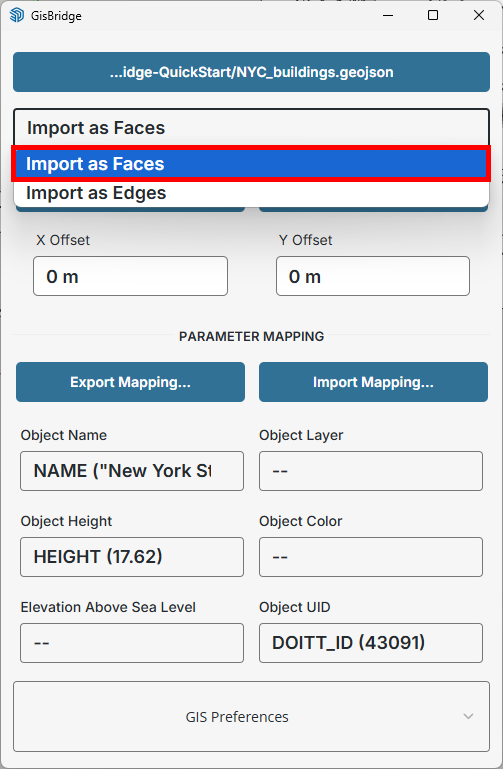
- Create Geometry: Click "Bake to SketchUp" to import building footprints as SketchUp geometry. You should end up with something like this:
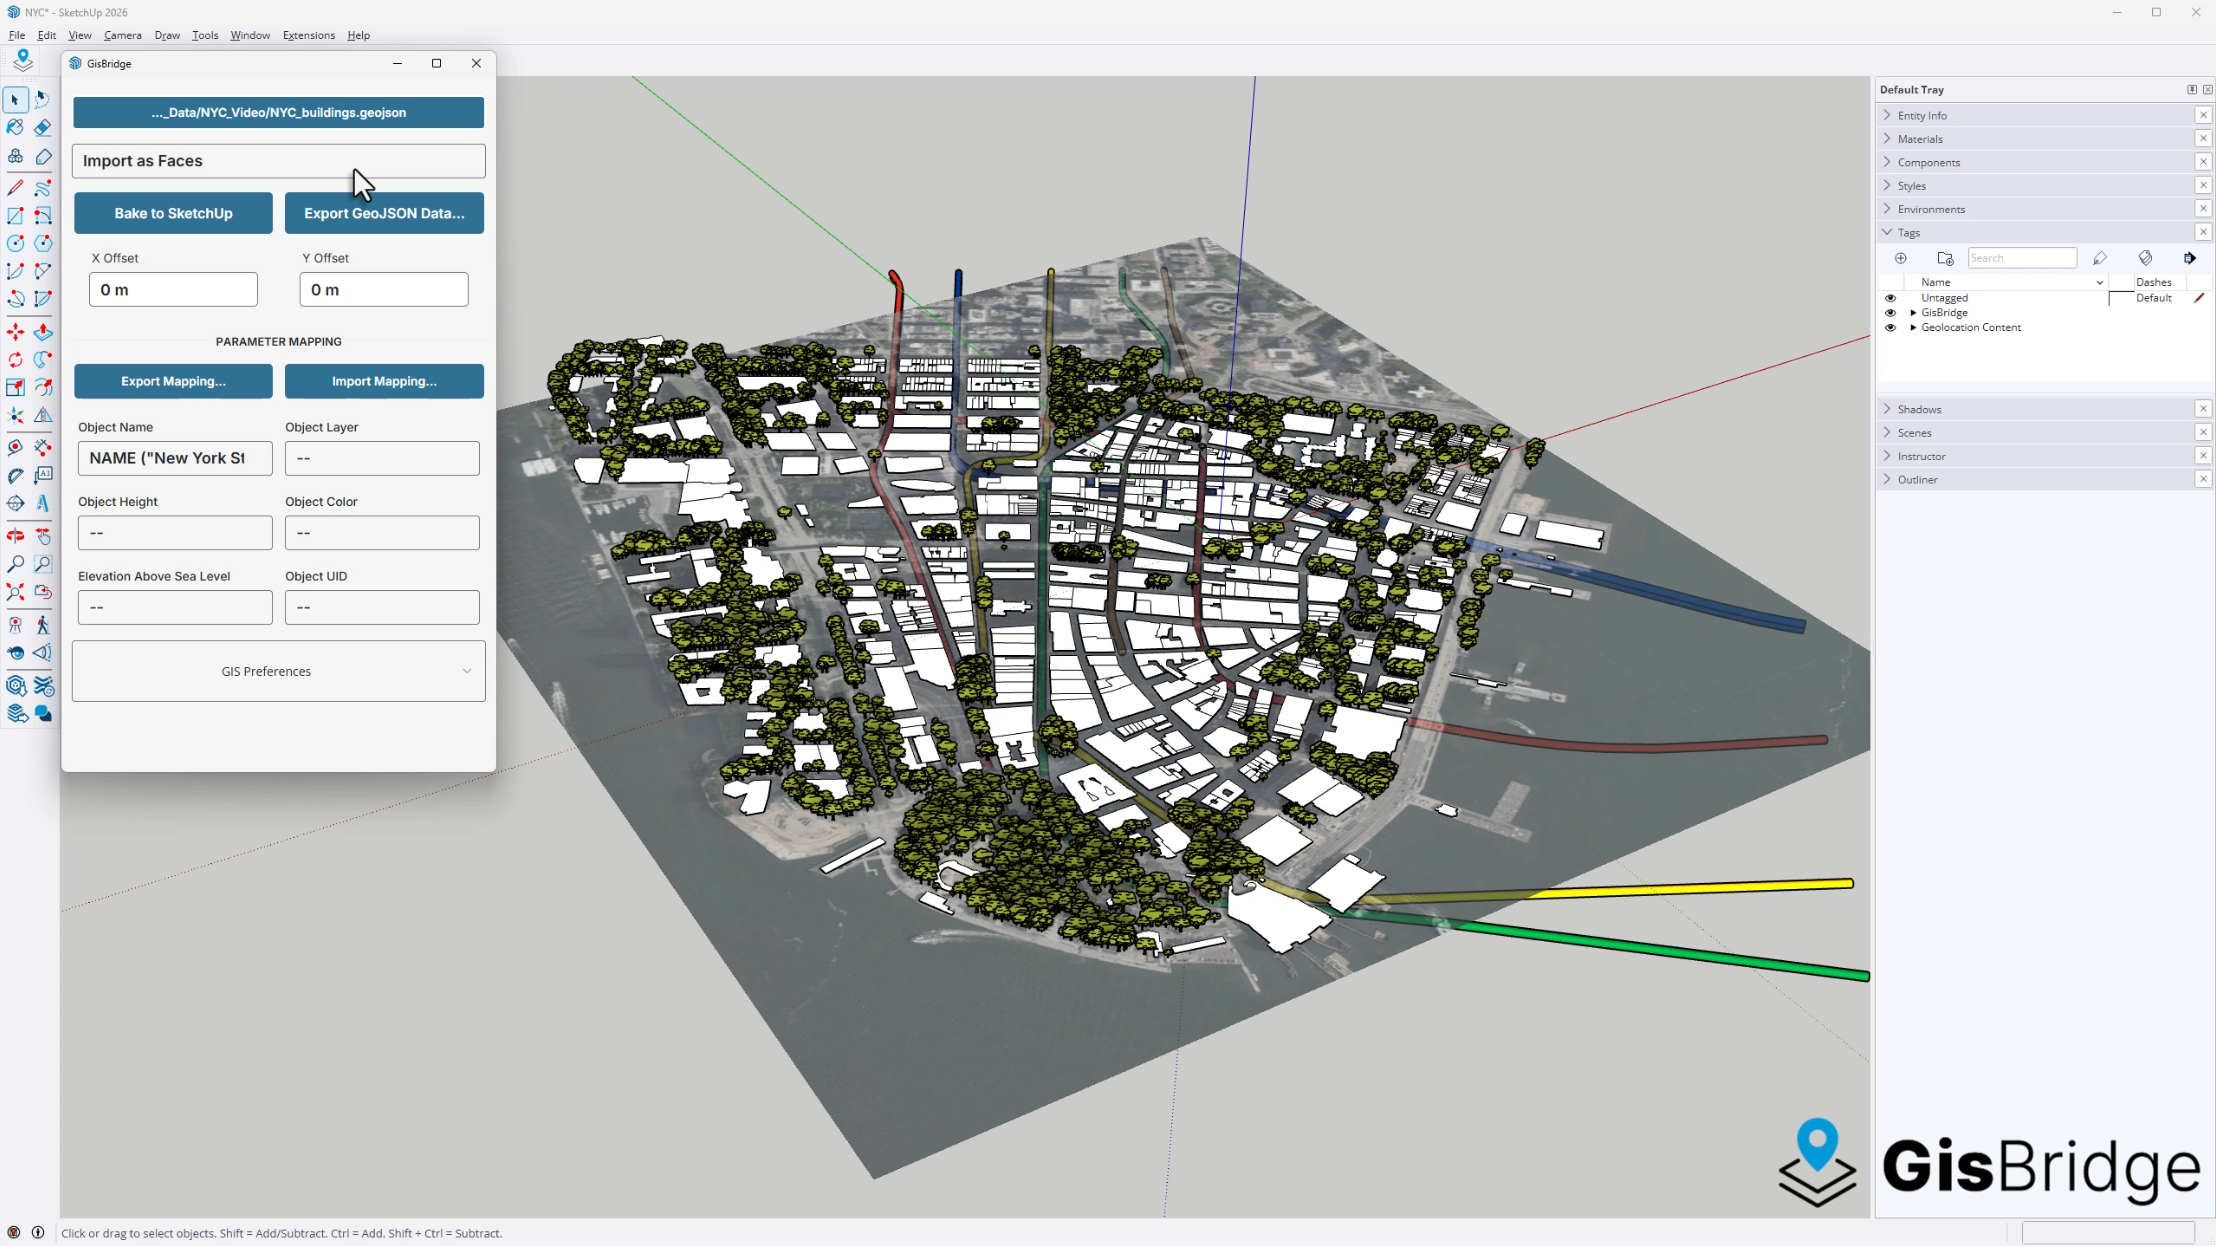
Verification
To verify the alignment of your imported data, you can use SketchUp's native Add Location tool to pull in low-resolution satellite imagery. The GisBridge-imported geometry should align perfectly with the real-world context.
Final notes
- Objects are placed to GisBridge Tag Folder, each on its own tag/layer. If layer is mapped, they will be placed to specified layer otherwise they will appear in the layer that has the same name as the imported file.
- The model is fully editable using standard SketchUp tools.
- Join our Discord community to help us shape the future of GisBridge!
Summary
GisBridge simplifies complex GIS workflows by providing real-time previews, automatic geolocation, and flexible attribute mapping, allowing you to build accurate urban contexts in minutes.